Putting in a new window? Follow this step-by-step DIY guide to build a custom window sill and install trim to make your view a beautiful one, inside and out.

The moment I walked through the front door of this old cottage, I fell. And hard. It was dripping with charm in every room, from the gorgeous floor to ceiling stone fireplace in the living room to the sweet built ins in the hallway.
Of course, being so old, the house also needed tons of updates, and honestly, we renovated almost everything right away. But some of the smaller tasks have taken us years to tackle.
Like replacing the worn octagon window in our family room.
That one was on our to do list for decades...and it was the last project in the family room to wrap that space up. So I was thrilled when my husband woke up one morning and replaced it.
While we tackled this carpentry project on a unique octagon window, the basic framing steps, tool list, and installation methods are exactly the same for a standard rectangular window.
The old window was out, the new one was in, and from the outside, everything looked wonderful. Unfortunately, finishing the inside was another story. Big surprise.

So, to make me a happy girl, my handy husband built a brand new, deeper window sill from a pine board, trimmed it out, and created a showstopper of a window that I adore.
DIY Window Sill and Trim Tutorial
What You'll Need:- Pine board (for sill extension)
- Molding/Trim for the outer surround (choose a style that matches your home)
- 1 1/2 and 2 inch Finishing Nails
- Hammer
- Cordless Drill (for pilot holes)
- Miter Saw*
- Nail Setter
- Shims
- Caulk
- Wood glue & Wood filler
- Sandpaper & Paint
Step 1. Measure And Cut The Sill Board
Once the window was installed he measured from inside the window frame to the outside edge of the sheetrock to determine his depth.
He also measured the perimeter of the window. For our project, he used a clear pine board (1 inch thick by 6 inches wide and 8 feet long), because clear pine has no knots for a perfectly smooth finish.
He then trimmed the width of the wood plank to the proper width of 4.5 inches.
For a standard window: You would cut one single piece of wood to fit across the bottom of your window opening for your sill. There are stock window sills you can buy, or you can make one. Be aware that depending on your window style, you may want the sill to either be flush with your wall or extend off the wall.
For our octagon window: He cut the board into 8 seperate pieces of equal length. To frame the octagon shape, he made 22.5 degree miter cuts on the edges. (If you're working with an unusual window shape, using an online angle calculator is much easier than doing the math yourself!)
Step 2. Fit and Fasten The New Sill
To fit the wood inside the window opening, he loosely preassembled the pieces to create a box, using wood glue and finishing nails.
He drilled pilot holes in the wood, before adding the nails, to lessen the chances of splitting the wood.
Next, he slid the box into the window frame and added a few shims to ensure that everything was level and snug. Fortunately, since our new window was the same size as the old window, very little shimming was required.
Once level, he secured it into the framing with finishing nails.
Step 3. Add The Trim Around The Window
To give the window a beautiful, finished look, he trimmed the outer edge of the window with more pine.
This board was 1/4 inch thick x 2.5 inches wide and 8 feet long. It complemented the plain sill wood, with its smooth low profile.
Of course, you can choose any trim wood that fits your home.
For a standard window: You would cut 4 pieces of trim to surround the window. You'd make standard 45 degree miter cuts at the corners to form a perfect 90 degree frame.
For our octagon window: This pine board was also cut into 8 pieces and mitered at 22.5 degrees to match the window's shape.

Step 4. Fill, Caulk, Sand and Paint
With the nails in place, he used a nail set to gently tap and recess each head slightly below the wood surface. Then wood filler was added to cover the tiny nail head holes.
A clean bead of caulk was added around the all the wood seams, corners and the gap where the trim met the sheetrock. That last detail gave the window a flawless finish.
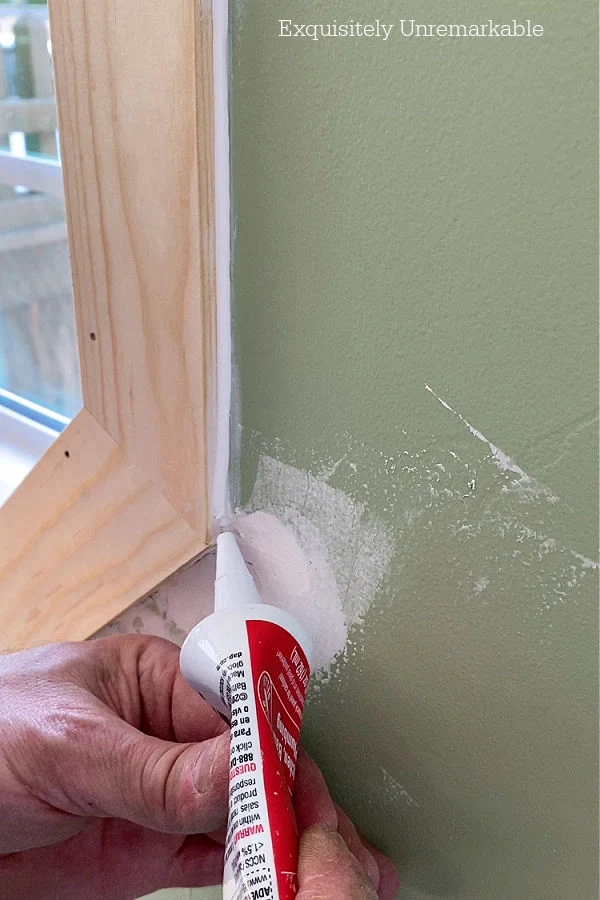
Once the wood filler and caulk were dry, he lightly sanded everything and then primed the raw wood.
He completed this DIY by painting the window sill and window trim with two coats of a good interior white semi-gloss paint.
When he was done, I had a fabulous upgraded window and a brand new view.

Have the opposite problem?
Is your window ledge sticking out way too far into the room instead of being too small? Yeah, this old cottage is filled with issues, so we had that problem, too. In our kitchen the sill was just too deep. Check out our step by step guide on how to cut back a deep window sill here.In this room however, a deep sill is just what this decor obsessed girl ordered.

Now there's tons of room for decor in that space.
Like flowers, or frames.
Or...well you get the idea.
😉
What's on your window sills?



Hi Friend,
ReplyDeleteWell, we both live in "This Old House" and thankfully we have handy husbands. ;-)
We have not had to go this far with windows, but we do have two piano windows to replace, so you never know.
I will be pinning your tutorial.
Carla
Oh Carla, I hear you! The old house blues are a real thing...and yes, it's a very good thing we have handy husbands. Of course, I just had to go look up piano windows. I'd never heard that term before. Very cool and super charming!
DeleteInteresting post and that's some DIY. The window shape is beautiful, but that deep sill really does make the entire look. I love the wall color, too!
ReplyDeleteThanks! That wall color is even more beautiful in person and the white window trim really pops.
Delete