Come see the easy steps that turned this cut and tattered sweater into a showstopper.
She has a real affinity for clothes and a definite style.
I remember when she was in preschool, I pulled out some of her older sister's clothes, thrilled I was going to get another wearing out of them. Silly mother.
Instead, she put her hand up and told me in no uncertain terms that, NO, those are not my style!
What? What style?? She was three!!
As she got older, it just got worse.
For example, the times...many, many times...when she wanted to wear something we simply did not own. She'd have a dress or outfit in mind, a piece she'd seen in a catalog or on TV and she could not go to school without it.
I would try to calmly explain that we could go shopping at another time, but right now, ten minutes before the bus, these were the only clothes we had to choose from and she needed to pick.
Quickly.
The morning usually deteriorated from there. You can fill in the blanks, I am sure.
Well, as a teen, not much has changed. I hold up the cutest pieces in the store, only to get a disapproving scowl from Little Miss Stylish; she still has very definite ideas about what she wants to wear.
The only difference now is that I am rarely involved in the dressing process and if she can't find what she wants, she makes it.
A few weeks ago, she decided that she needed a cardigan in a color we did not have.
No problem, she told me, I am just going to cut this pullover up the center ~ the fact that it was her sister's sweater did not seem to be of consequence to her at the time ~ but that is a story for a whole other day.
How To Turn A Pullover Into A Cardigan Sweater
1. First, she cut...straight up the center from the waist to the neck.
And the sweater looked really cute, but it definitely wasn't done.
The ends were ragged and fraying and I knew it wasn't going to make it through more than one washing or wearing, so I decided to finish the ends off for her with ribbon and add a bow clasp at the top.
The design team approved and I got to work.
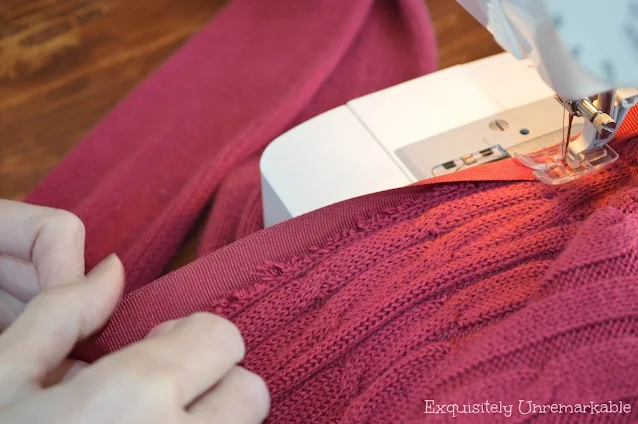
2. I simply wrapped the ribbon around the cut edge, on the sides, the top and bottom.
3. Then I folded it over, like I was wrapping a gift and stitched it into place with my sewing machine.
4. First one side and then the other!
Helpful tip ---> How To Get Along With Your Sewing Machine
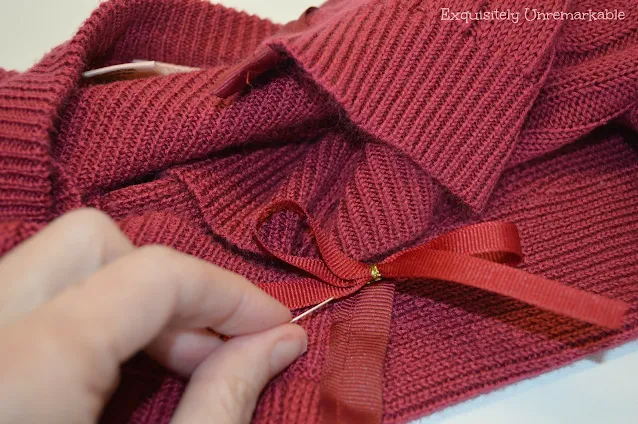
5. I made a bow, using my Bowdabra Mini Bow Maker and stitched it on at the neck as an embellishment.
It was also there to hide the snaps that I was adding to the neck so it could close and lay better around the neck.
6. I sewed one end of the snap onto the back of the ribbon and the other on the sweater. I did it by hand and took just a few minutes to do.
Voilà ~ Custom fashion!
The sweater has a much more polished look now, will hold up in the laundry and actually looks better than it did as a pullover...

...and believe it or not, even though it was her sister's and I did have a hand in its design, it's STILL her style.
Imagine that.
Do you restyle clothing?
If you would like to see a few other sweater posts, you can click here or here!


This is absolutely fantastic! My daughter is the EXACT same way when it comes to her style of dress. I used to make her skirts and such, but she would NEVER be caught in anything handmade by me. But, she will alter some of her own things. xoxo Jen
ReplyDeleteThey definitely have a mind of their own Jen, that is for sure!
DeleteLol! As the mother of three daughters, I can relate! A lot of times I found myself trying to embellish their clothes to make them look fashionable, since the two younger ones did wear a few hand-me-downs. This sweater is so cute!
ReplyDeleteThanks Rhonda! Fashion drama times three, I totally get it! I really enjoy creating and embellishing clothes and would do it more often if they let me! ;)
DeleteCute, cute, cute! Unbelievable the transformation it went through:) I love the little bow.....looks quite fetching and I am loving the lovely wine color! Your daughter sounds like my youngest one popularly knows as the "fashionista" in our household:) Have a wonderful week, Kim!~hugs, Poppy
ReplyDeleteThanks Poppy! It was a quick and fun transformation with a happy ending! I bet your "fashionista" keeps you on your toes, too! :)
DeleteThat's so stylish, and I'm nodding my head in agreement because I have two fashionistas and completely understand what you go through as a mom -- morning meltodowns, "borrowed" clothes etc.! Happy Mother's Day! :)
ReplyDeleteAh yes, Dee, the "borrowed" clothes drama is always...entertaining! ;)
DeleteHi Kim, wow you can even sew too! You did a fabulous job on refashioning the sweater and looks perfect!
ReplyDeleteJulie
Thanks Julie! I can sew...just don't look too close! ;)
DeleteThat turned out so cute! What a great idea.
ReplyDeleteI do not sew but I took 5 things to the alterationist yesterday. Pants becoming shorts, a hi lo shirt will come out with an even hem, and some simple things that aren't simple to me. :)
Thanks! Most of my clothing sewing skills came out of my costume designing days, Stacey. I never really made apparel, I usually refashioned or altered items to fit the actors. I also had to do it in a way that was easy to undo, so that we could reuse the costume in the future. I cheated in any way I could, all the time! I actually just bought a dress and needed the shoulder straps shortened and I went to a pro! :)
DeleteVery cute. Nice job!!
ReplyDeleteThank you Lori! I am not usually a enthusiastic seamstress, but this was a fun project!
DeleteHi Kim,
ReplyDeleteYou did a great job! Love the ribbons; they're adorable!
Poppy
Thanks Poppy! I love the little bow, I think it's so sweet! I'm glad my daughter does, too! ;)
DeleteKim, I love the ribbon on it. It's a good way to recycle a sweater, and you made it look easy! xoxo
ReplyDeleteThanks Su! It actually was pretty easy, considering that I am not a fabulous or very experienced seamstress! :)
DeleteOkay, Lady. We all would like to know . . . is there anything you CAN'T do. This is a terrific look!
ReplyDeleteOh Cheryl you are too kind...and yes, there are plenty of things I cannot do and if you want a running list, just ask my kids! ;)
DeleteThat turned out great! What a clever idea : ]
ReplyDeleteThanks Jennifer! My daughter should get the credit for the restyling...I was really just the clean up crew! ;)
DeleteThis is sooo cool! Again, projects like these makes me want to learn how to sew - maybe someday!
ReplyDeleteI don't know Vel, those doll clothes you made were certainly more elaborate than my sweater...and you did that with glue!! :) I was impressed!
DeleteI love this!! It looks great with the ribbon!
ReplyDeleteThanks Lucy! I am so glad that liked it! :)
DeleteVery, very cute, Kim! I love that she was able to take something and refashion it to make it her own ~ that is a genius in the making! (I really love that you were able to find and use a ribbon that matched so perfectly!)
ReplyDeleteThanks Cher! I will pass your comment on to her, she will be thrilled! That ribbon was from a dollar fabric store nearby. They have EVERYTHING! :)
DeleteWait! You SEWED and didn't make any comment about the bobbin giving you trouble?? Cool!! :-D
ReplyDeleteOh yeah, and I like the sweater turned cardigan. I have a few dresses that are in the works for being altered, but haven't got more than cutting off the extra length yet. You did great just DOING it.
p.s. I'm glad I have 3 boys.
Looks like I'm getting better at this, huh, Nancy? Haha yes, some days my mom used to say that she would trade us girls in for 10 boys...now I know why! ;)
DeleteCute, cute, cute! Love creating something new from something tired!
ReplyDeleteThanks for following my blog. I just noticed that. I was already following you.
Thanks! This one came out better than expected!
DeleteUltra cute, Kim. You did a great job. I'd never guess that it's a transformed pullover. It's pretty neat, too, that your daughter makes her own things and that you're cool with that. :) xx ~ Nancy
ReplyDeleteIt was actually a ballet sweater, we purchased it a dance supply store and I really enjoy and support her creative streak! Of course, if she decided to get creative with my car or my couch, that may be a different story! ;)
DeleteWhat a great idea - I like how it turned out. Pretty color sweater, too.
ReplyDeleteThanks Kimberlee! I really like that color, too!
Deletelove it! brilliant idea :)
ReplyDeleteThanks! It was a collaborative project...the initial brilliance was all my daughter! ;)
DeleteSuch a great restyle! I love the ribbon, it's so sweet and feminine.
ReplyDeleteThank you, Brandi! It was easier than I thought it would be! Now we are looking for other sweaters we can cut! ;)
DeleteI <3 your refashion!!!!! Pinned
ReplyDeleteThanks Michele!! I love getting Pinned! ;)
DeleteWhat a great idea! It's so cute.
ReplyDeleteI would love for you to share this at my t.g.i.f. linky party :) Have great weekend!!
Thanks Wendy! I'll check it out! :)
DeleteKim, such a fabulous tutorial! Thank you for sharing. You are one of the fan favorites today at the Sunday Showcase from the Make it Pretty Monday party at The Dedicated House. Here is the link so you can check out your feature. http://www.thededicatedhouse.com/2014/05/sunday-showcase-from-make-it-pretty_25.html Hope to see your prettiness again tomorrow at the bash! Toodles, Kathryn @TheDedicatedHouse
ReplyDeleteThank you Kathryn! I'm totally flattered and so excited!
DeleteI love individuality . . . (even though it can bring some challenges.). The sweater looks wonderful, Stylish very!
ReplyDelete(Could "this daughter" have some of her mother in her . . .)
Yes, grrr, that one had individuality and challenges! Ha! She may have picked that up from me, too! ;)
DeleteWhat a great idea!. I have converted sweat shirts to cardigans, but never considered pullovers. I am glad I saw this before I donated mine! I must try this before the fall season.
ReplyDeleteAnd I have never tried it with a sweatshirt, Janice!! Thanks for the idea! :)
Delete