We chose vinyl plank flooring for our family and the DIY installation was quick and easy. Here's our step by step guide.
 |
| This post is sponsored by Ryobi |
Decorating decisions are seldom made in a vacuum.
One small change invariably inspires another.
Such is the case with our family room.
The moment I decided we needed to replace my beloved floral sofa, all those years ago, I knew the entire room was going to need to be refreshed.
New paint was a given.
And that old wall to wall carpet had to go.
I wanted a wood floor in the room. It suited the space better, was much more cottage style and played nicer with my allergies.
Of course, my husband had other opinions.
You see his brain works differently than mine.
When I think renovation, I picture a beautifully curated sitting room filled with fresh paint, florals and checks.
He, however, sees all the steps necessary to get from old room to new. All the work, all weekends and all the potential problems. So he wasn't nearly as excited about the DIY.
Plus he was already knee deep into a hallway renovation.
However, once I brought home a few of the flooring samples and he saw my vision, he jumped on board.
How To Install A Vinyl Plank Floor
Installation was relatively simple. We didn't use glue and didn't need to lay any foam or paper down. We chose a click and go product and the job was done in about three hours.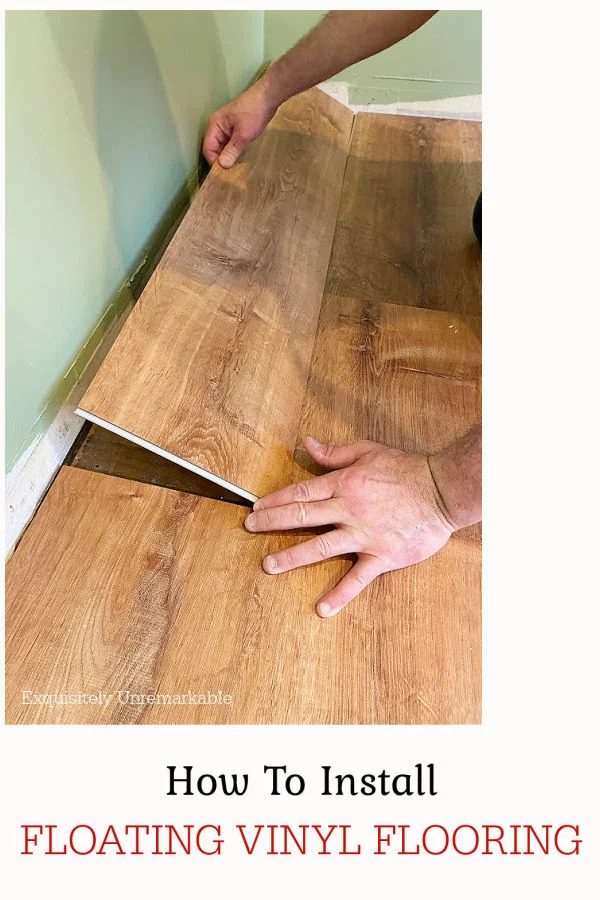
1. Choosing A Floor
Before we installed the floor, we had to pick one. And that wasn't easy.
There are so many flooring choices on the market today and deciding which was best for our needs took some investigation.
First we considered our price range and our desired look. We knew that the family room would have a large rug, covering most of the floor and that water damage wasn't going to be an issue, like it would be in a laundry room or kitchen.
That meant we could have a hardwood floor.
Then we considered the ease of installation. When we renovated the kitchen, we put down a prefinished hardwood floor, and while it's held up beautifully, needing only a few minor repairs, and it's the real deal, it was a lot of work to put down.
Laminate planks were a strong contender, but in the end, we settled on vinyl mainly because it was inexpensive, softer to walk on, available off the shelf for immediate pick up and clicked to install.

Our choice was Lifeproof Luxury Vinyl Plank Flooring in Trail Oak from Home Depot.
Available in tons of color, it got great reviews both online and from real life friends.
It didn't require any glue or underlayment and for our 10x20 room, it came in at a little over $700.00.
We used the calculator on the site to figure out how many boxes we needed, which even included an option to add 10% extra for breaks or waste. We checked that box and highly recommend it, because we basically used it all.
We ordered it for pick up, so we didn't have to wait for someone in the store to drag the boxes down from the ceiling.
Super convenient.
Supplies
Flooring
Cordless Flooring Saw
Rubber Mallet
Small Block Of Wood
Small Flat Pry Bar
Floor Leveling Compound
Flooring Trowel
2. Evaluate And Prep The Subfloor
I have to say, the process of laying down the new vinyl plank flooring was relatively simple.
The prep was the issue.
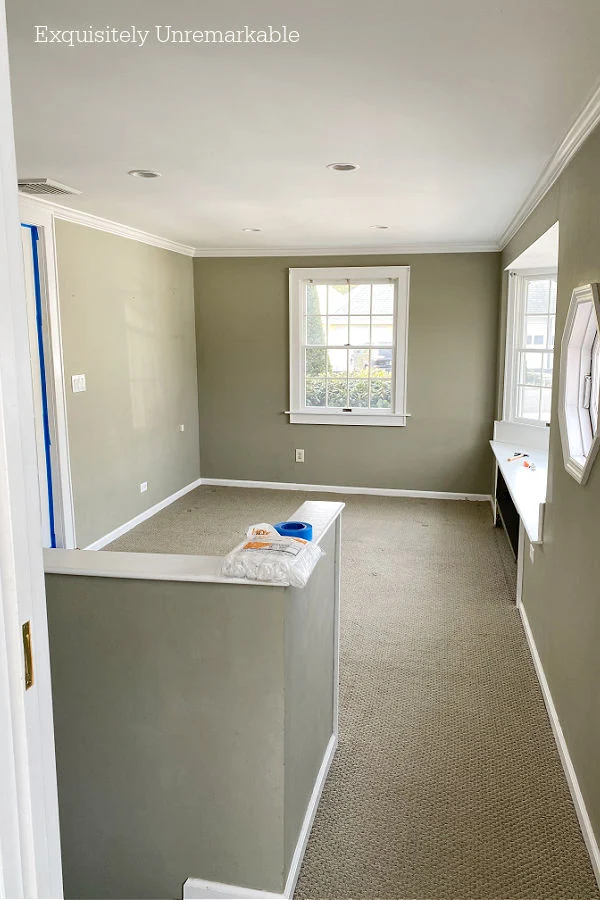
We were not so lucky.
The reason we had wall to wall carpet in that room, is because it was an old covered porch, converted to interior space more than 50 years ago.
Once we ripped that carpet up, we revealed the mismatched subfloor. Half tile, half plywood and very uneven in many places.
3. Level The Floor
Most vinyl and laminate plank flooring requires the subfloor to be level to a 3/16" or 1/4". The manufacturer's recommendations will give you the specifics, but overall, it needs to be flat or your boards will separate at the seams.

My husband used a trowel and built it up in very thin layers, over several days, letting each coat dry thoroughly in between.

You can sand it, but with my allergies that wasn't going to happen.
So he was careful during the application and gave it a feather edge so it blended right into the floor.
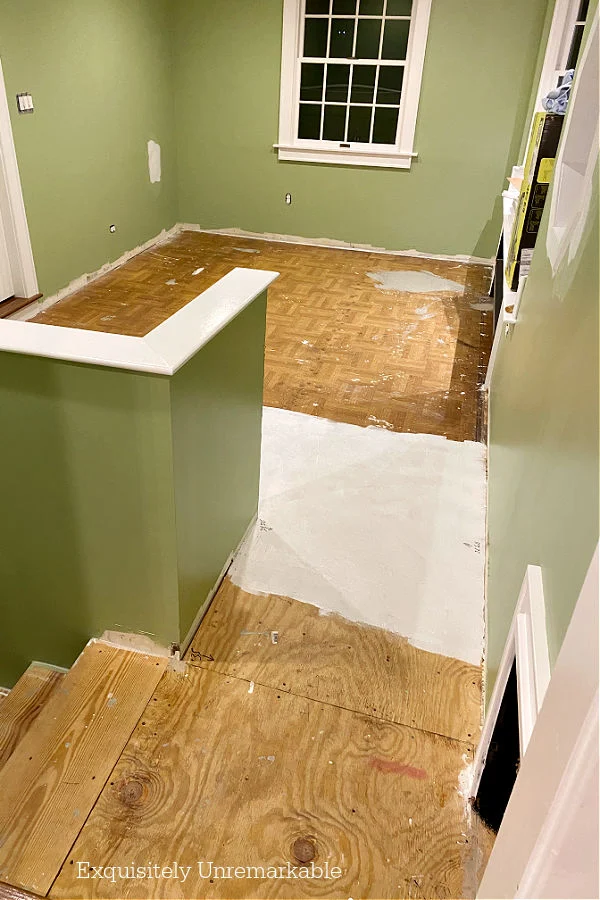
Meanwhile, all this prep gave the flooring time to acclimate to our room temperature and humidity. A solid 48 hours is usually long enough.
4. Remove The Mouldings
We wanted our flooring planks to tuck under the mouldings so we removed them before the install. If you don't want to do this, you can install the floor against the wall or existing mouldings and place an additional finishing strip around the base of the room.
You can use wood or vinyl, since most floors come with a variety of accessory options.
Just keep in mind you need to leave a 1/4" space around the perimeter of the floor for expansion and movement.
5. Plan Your Pattern
Once the floor was level, it was time to plan.
We needed to decide not only which direction we wanted the planks to go in the room, but we also needed to consider spacing, cuts and seams.
Our planks went lengthwise, to match the pattern of the adjacent kitchen floor and elongate the room.

That meant that the end cuts would land behind the sofa and at the entryway by the stairs. Easy enough. That gave us a starting point.
Since the boards are all one length, in order to get a staggered seam pattern we would have to begin laying planks of different lengths, so all the seams didn't line up. We wanted them to be offset, like a hardwood floor.
The rest of the planning was focused on where the long ends of the planks met the walls. We didn't want a 2 inch wide plank on one side of the room and an 8 inch one on the other.
So we laid the floor out to make sure it was centered and visually appealing.
Luckily, the plank size was very compatible with our room and we didn't need to cut much of anything on the sides.
6. Installing The Floor
Once we were ready to go the process was lightening fast. I think we started the install after breakfast and were finished before lunch. No kidding.Since the vinyl flooring came with a thin rubber backing, it didn't require any special underlayment.

We gave it a quick tap with the rubber mallet and moved on to the next plank.
If the rubber mallet didn't make the proper connection, we placed a small block of wood up against the plank and tapped again until everything clicked together and laid flat.

Ok well, that's the quick and dirty version.
We did use a square to make sure that our first board was truly straight, because nothing in this old cottage is reliable.

7. Making Cuts
When it was necessary to make cuts we used our cordless flooring saw from Ryobi. It's specifically made to cut flooring and was a breeze to use.
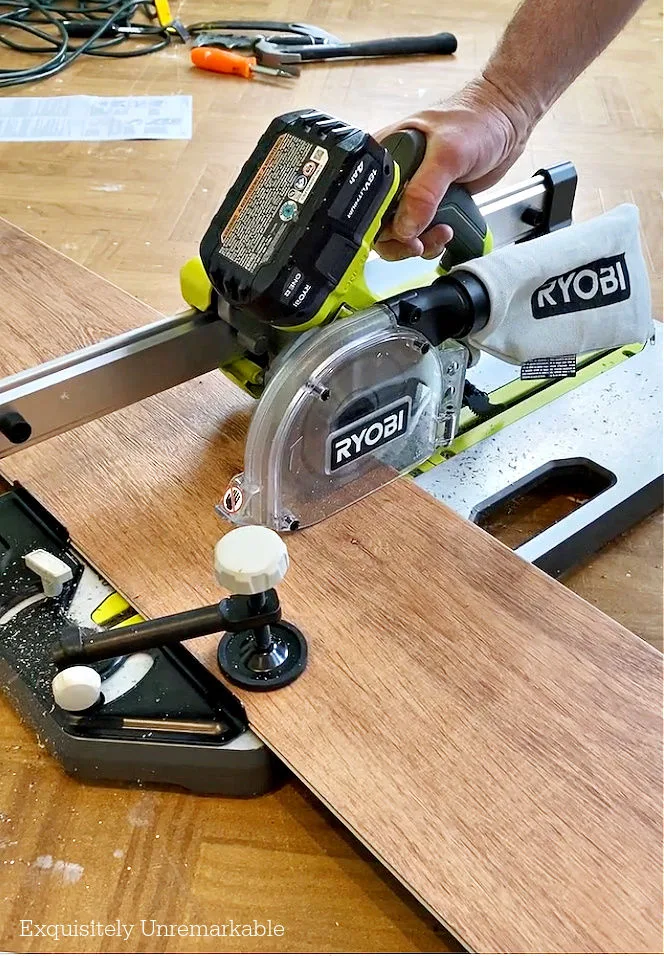
Plus it had a bag on the back to catch most of the shavings so we could use it inside without bothering my allergies.
And it saved time, rather than running outside every few minutes to make a cut.
The first cuts were made to set the pattern, the last were to end the room. Additional cuts were made where necessary to fit boards under the radiator, etc.
8. Installing The Floor Close To The Wall
Planks close to the wall were installed the same way, click and lock.

However lowering them into place was the trickiest part.
In order to get the floor to fit snugly to the wall we used a small pry bar to guide the planks and keep that 1/4" space. Any similar tool will do the same.
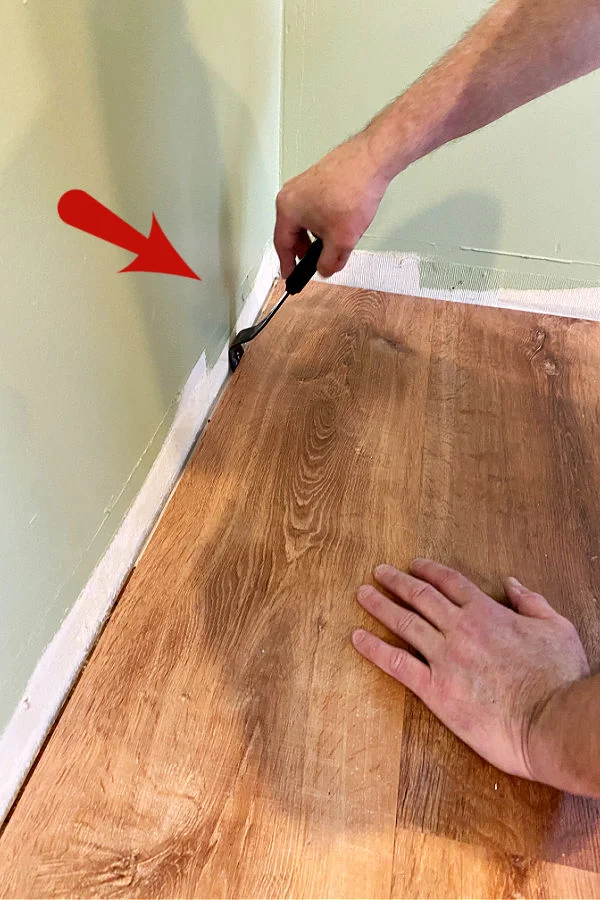
My husband did use a little bit of his crazy DIY skills to fit the flooring under the pocket doors, since there's a special decorative moulding there and he didn't remove it.
Instead he trimmed the bottom of the moulding just enough to allow the vinyl flooring plank to slip underneath it.
Again if you're going to use a piece of wood or vinyl moulding trim to cover your edges you wouldn't need to do this, but we wanted it to be consistent with the rest of the room, so he went the extra mile.
9. Replacing The Trim Moulding
The final step in this process was replacing the trim that he removed before we started. The old mouldings were trashed, so we bought new.

The floor is beautiful.
I love the color and wood grain pattern. It's very soft to walk on and it coordinates perfectly with the new green paint on the walls.
It's quite a before and after.

Of course, right now, we're waiting on that couch, so there's no rug choices to make.
Well, almost no rug choices.

You see this room also has a set of stairs that go down to the basement.
So I guess I lied. They need a runner.
And...the final step in the flooring process was capping the top step.
But that's a story for another day.
And another DIY. 😉
Have you ever installed vinyl flooring?
This post is sponsored by Ryobi. You can read my full disclosure here.


The new floor looks amazing. You and your husband are a good team. - Briana from Texas
ReplyDeleteThanks Briana! I am so happy that carpet is gone!!
DeleteThat is BEAUTIFUL!!!!!! We did that with our kitchen/breakfast nook last year, and I STILL love it!!! I also love your green paint....I can hardly wait to see the room all done!
ReplyDeleteBlessings,
J
Thanks so much, J!! It's a great floor isn't it? I was so ready to cover up whatever we put down with a big fluffy rug...but now, I just want to see the planks!!
DeleteYou did a great job. What a great DIY team. We have used LifeProof in our last home and loved how easy it was to put down and how well it held up. Your room is coming together so nicely. I cannot wait for your furniture to come in and see the room together it is going to be so wonderful. xoxo Kris
ReplyDeleteThanks Kris! We're very happy with it all so far! The flooring was so easy to work with and my husband, who was not at all interested in ripping up a carpet and tackling this job, loves it more than I do. He likes it better than the wood floors in all the other rooms of the house. It's always the way...xxoo
DeleteThe floor looks great! Kudos to you both for a job well done. I bet it feels good to have new painted walls and a nice new floor. We have travertine for flooring.
ReplyDeleteThanks so much, Linda! It really does feel nice, the room just feels more modern and very fresh. I hope you’re having a lovely week!
DeleteThe floor looks beautiful, Kim. Vinyl plank is great stuff and it's SO easy to maintain. I can't wait to see the room finished!
ReplyDeleteSo far so good, Ann! I have to say we were so impressed with the ease of installation and the way it looks. Now I'm just waiting on that couch!!
DeleteIt looks so pretty. I love the colors that you selected both for the walls and the floors. Very nice.
ReplyDeleteThanks Lorri! I’m really happy with the palette so far.
DeleteThis turned out beautifully - and I salute your adventurous spirit in doing this yourselves! That is quite an undertaking! I know we are waiting (im)patiently for the final reveal!
ReplyDeleteThank you so much, Kristine!! I'm just the idea girl over here...without my DIY guy there'd still be a carpet in that room. I'm just happy he enjoys a good challenge!
DeleteYou guys make a great team and make these DIYs look so easy!
ReplyDeleteWhy thank you! Easy DIYs are our favorite!!
DeleteThe floor looks fabulous, Kim! It looks so much like the floor that we have in our Florida place, and I love it. I'm in awe of you and your husband's mad flooring skills! Is there anything the two of you can't do?!?!
ReplyDeleteThanks Amy! We love the floor, too, and a DIY challenge. Honestly though, the prep was the rough part. Putting that floor down was a breeze. I hope you’re having a sunny day!
DeleteBeautiful! We installed vinyl plank flooring in our bathrooms last year and just love them. They feel like the real thing with bare feet and are so easy to keep clean!
ReplyDeleteI was pleasantly surprised, Marie. They look amazing and the do feel nice. I'm going to be doing my yoga in that room and the floor is perfect for that!
DeleteBeautiful.. and we did the same in our kitchen with the snap wood flooring. The entire week before we started our project my husband continued to chant "We Have to Start Square!"
ReplyDeleteThanks Carla...and yes, sounds like our husbands' brains work the same way! Happy Mother's Day!
DeleteYou made the perfect choice, Kim. It's beautiful. xo Laura
ReplyDeleteThanks so much, Laura! I was surprised by how easy it was...well, easy for me! Haha!
DeleteThe new floor is beautiful. We would've taken the moldings off too.
ReplyDeleteWhat's the time-line for the couch?
Thanks! That couch has a 6-8 month delivery window...so we are looking at late summer, early fall. Ugh.
DeleteI love the color of the floor. It did sound like it was easy to install!
ReplyDeleteIt really was, Penny!
DeleteIt looks fantastic, Kim! WOW!!! You did a wonderful job. I can't wait to see the whole room pulled together. We are geting ready to do the same thing in our RV. It is now partially carpeted and has some vinyl flooring. So ready to get it done! Love that Ryobi floor saw. Will have to see if my son has one of those. He has just about all the Ryobi equipment...and loves it. Happy Mother's Day- Diana
ReplyDeleteOh, you're RV makeover sounds like fun...a mobile house reno! I bet it's adorable. The Ryobi saw was super helpful. I would definitely ask your son if he has one. Either way though, this floor goes down fast. I hope you'll share a picture when it's done!! xxoo
DeleteWow! Kim, I love the new flooring you and your husband picked out for the LR. Your husband did a great job with the paint job and the flooring! You both have saved so much money by doing this work yourselves. I'm glad you are happy with your new floor Kim.
ReplyDeleteThanks so much, Julie! We love it and we definitely do save a lot of money by DIYing things, but it does take longer.
DeleteKim,
ReplyDeleteLove the new flooring and Kudos to doing it yourself...Joe is NOT handy so I had to hire guys to do my flooring downstairs....BUT what has left me breathless is the color of those walls!! Stunning!! I say this because it looks quite similar to the color of my Craft room walls!!! Great minds think alike!! LOL!!
Hugs,
Deb
Indeed, Deb! I love that green. I saw it somewhere in a catalog and it was perfect and looks just the same on my walls!! I can't wait for the couch to arrive to pull the whole room together! Happy Wednesday!!
DeleteI love the new floor, Kim. They've definitely got a cottagey feel and so warm and inviting too. I would give my left arm to do something similar in our house. We have terracotta tiles throughout and some have cracked, but the budget doesn't allow it just yet.
ReplyDeleteThanks Michelle! We really do love it and it was a great way for us to get a wood look (and ditch that carpet) without breaking the bank.
Delete